Not so long ago there was pretty much one way to interact with a video game: You sat down and played it. Maybe you watched an older friend or sibling play while pointing out all their mistakes, but gaming was never what you'd call a "spectator sport."
That's changed in recent years thanks to YouTube gaming celebrities, the booming popularity of professional e-sports, and most importantly, the online game-streaming service Twitch. Firing up a stream and watching someone else play a thousand miles away is now a perfectly legitimate way to enjoy a game. Best of all, anyone is free to participate on either side of a Twitch stream—PCWorld even has its own Twitch channel. If you want to be the one gaming in front of a live audience, you can start doing it today, for free.
Here's how to stream your games on Twitch.
PC requirements: The bare minimum
This guide assumes that you have a PC with a discrete graphics card and processor powerful enough to stream games. At least to start, you'll be running your game and uploading video and audio at the same time. There are many Twitch pros who actually use two PCs to accomplish this—one for streaming and one for gaming—but that's a complex setup that's beyond this beginner's guide.
Twitch recommends that your PC has at least an Intel Core i5-4670 or the AMD equivalent, and 8GB of RAM. Your graphics card isn't as important a consideration for streaming, but Twitch says it should be at least DirectX 10 compatible. Though if you want to play a modern game, DirectX 11 or 12 is required. (See our guide for the best graphics cards for PC gaming.)
Keep in mind that these are the minimum recommended specs, and a more powerful PC will obviously perform better. Also don't forget about your internet connection. Twitch's Broadcasting Guidelines says you'll need to deliver about 4,500 to 6,000 kilobits per second to deliver 1080p at 60 frames per second, and 3,500kbps to 5,000kbps for 1080p at 30fps.
Getting started with OBS Studio
To start broadcasting to Twitch, you'll need two additional things: desktop software that can record and stream footage from your gaming computer, and a Twitch account. We'll start with the software.
Options abound for desktop streaming software. You can find debates over the relative merits online, but we recommend one broadcasting suite that's free and easy to set up—plus it integrates nicely with Twitch. The program is called Open Broadcaster Software Studio (frequently shortened to OBS Studio), which is the replacement for the classic OBS software.
We'll discuss the OBS Studio client for Windows, but Mac and Linux versions are also available.
 Ian Paul/IDG
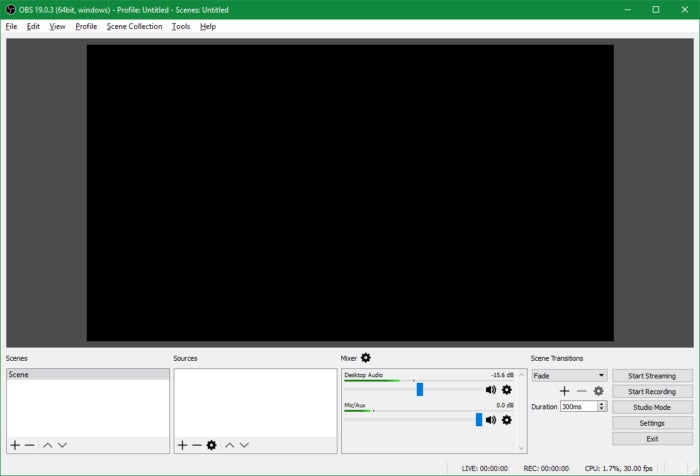
The OBS Studio interface on its initial launch. (Click on any image in this post to enlarge it.)
Once you've downloaded OBS Studio and run through the installer, the client will launch. You'll see a window with an empty letterbox screen, and a bank of options at the bottom. Here, you'll set up the "scene" and sources for your broadcast. The scene in OBS Studio is the final product that you'll show on Twitch, while the sources are all the various elements that make up your scene.
Most Twitch gaming streams aren't just a plain screencast of the game itself; they usually include multiple sources, such as a picture-in-picture webcam feed of the player, a watermark, and sometimes even animated screen overlays. Animations are beyond the scope of this tutorial for beginners. We'll stick to the four basic sources: the game, the webcam, player audio, and the watermark.
Source 1: How to set up the game stream
We'll start by adding the most important element to the scene: the game window.
 Brad Chacos/IDG
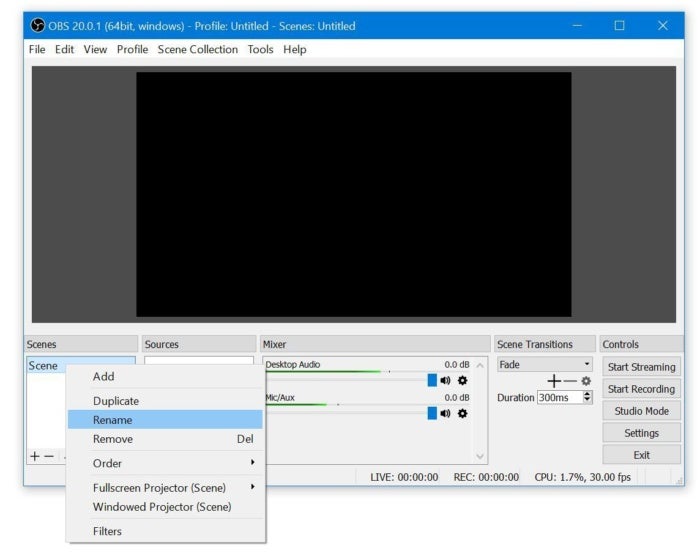
Before we do that, however, let's rename our scene something more memorable. Below the letterbox, right-click Scene in the left-most panel at the bottom of the OBS window. Select Rename and then give it a better name. In my example, I'm going to stream The Witcher 3 ($40 on Amazon) so I'll title my scene with the game's name.
Now let's add the game feed. Start up your game, and once it's running press Alt + Tab to navigate back to the OBS window. It doesn't matter whether the game is in full-screen or windowed mode.
TIP: Multi-monitor users should put OBS Studio in a secondary monitor during the setup process to more easily see what's going on.
 Ian Paul/IDG
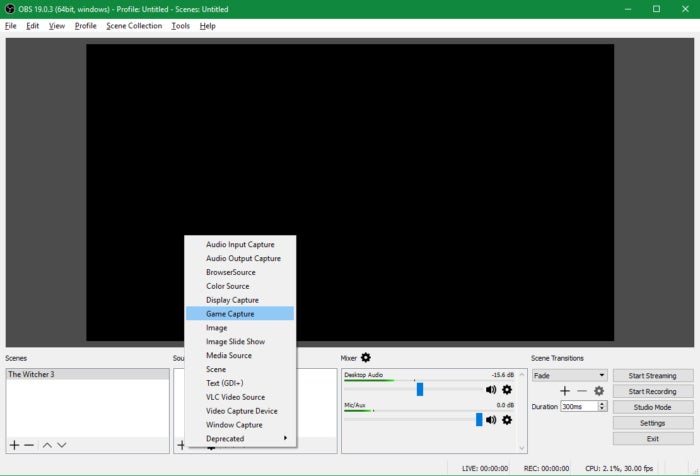
Select Game Capture in the sources window to get started.
Next, you'll add a new source. Click the plus sign in the Sources panel, and from the menu that appears select Game Capture. This will pop open a second window, but just click OK here to open yet a third window.
 Ian Paul
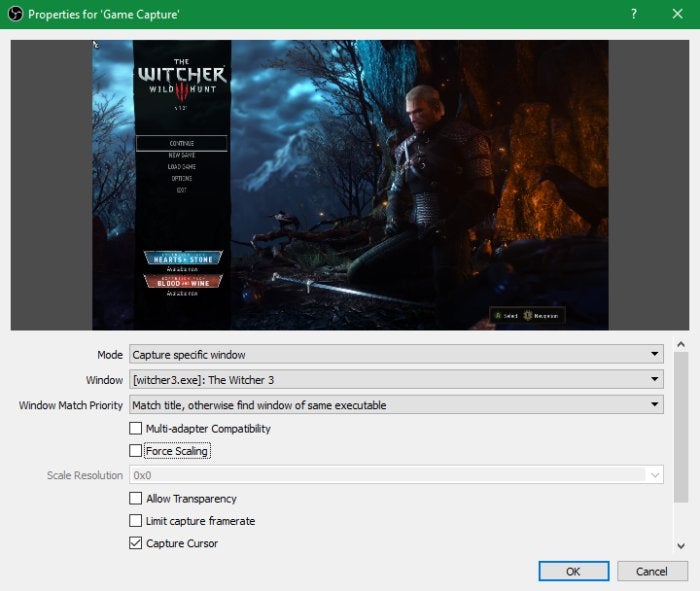
Geralt is waiting patiently while we set up OBS Studio.
This is the properties window and where we add the game. At the top, click the drop-down menu next to Mode and select Capture specific window. Then set the Window drop-down menu to the executable file of your game, which should be listed since it's running. In my case it's witcher3.exe.
Once you've selected your EXE file, you should start to see a preview of your stream in this pop-up window. There are also a few options you can tweak here—experiment with them if you so choose. Now click OK to return to the main OBS Studio window.
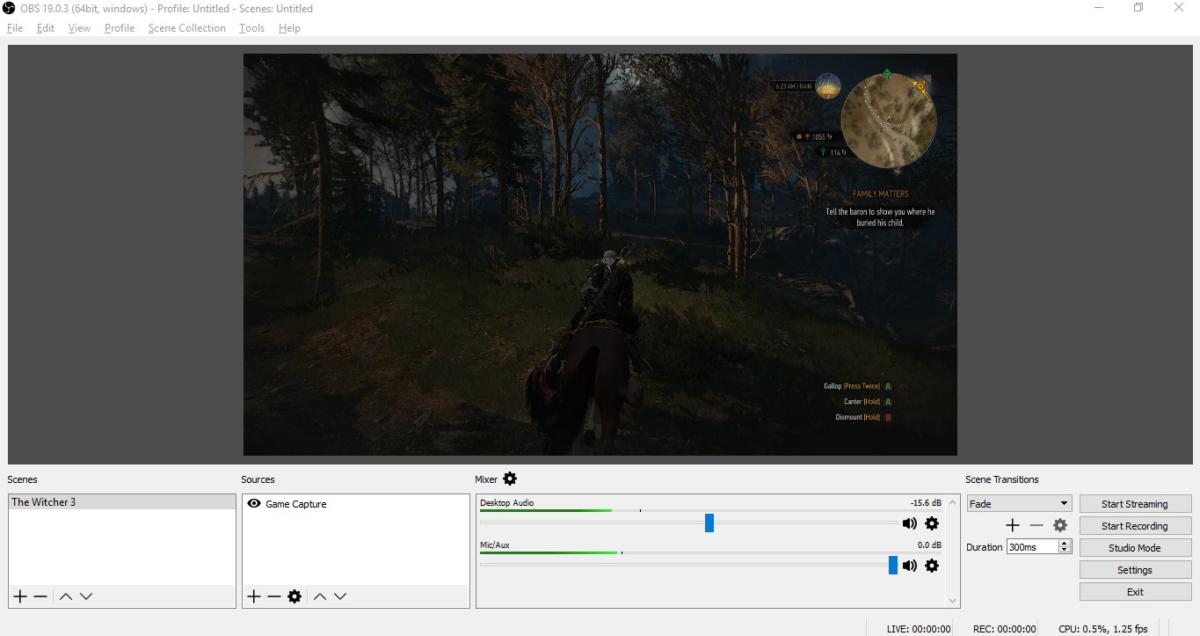 Ian Paul/IDG
Previewing a game stream in OBS Studio on a secondary monitor.
At this point you can see a preview of your stream running in OBS. It should appear surrounded by a red outline. If not, just highlight Game Capture in the Sources panel or click on the game feed itself.
You can use the outline to change the size of the game window. In my case, I ran Witcher 3 at 720p since my external GPU setup can't handle this game at 1080p. That meant I had to drag and extend the outline to make the game fill the entire letterbox window.
Since OBS Studio is so flexible, Game Capture isn't your only option. You can also stream your whole desktop instead of just a single program by using the Display Capture option in Sources. This is a good tool for broadcasting something that uses multiple programs, such as a screencast tutorial.
In the OBS Classic days a number of games wouldn't work with OBS's default game capture mode. Instead, you had to broadcast your whole desktop. During my time with OBS Studio, however, I didn't run into that problem.
Source 2: How to set up the webcam feed
Adding a webcam stream gives your gameplay a personal touch. For Twitch streamers, the webcam feed is standard practice. If your PC doesn't have a webcam, the Logitech C922 ($80 on Amazon) is a stellar one you can add to any PC. It's very popular with streamers.
To set it up, click the plus sign in the Sources box once again, and from the context menu select Video Capture Device. Once again, a small window pops up that you can pretty much ignore. Just hit OK to get to the new properties window.
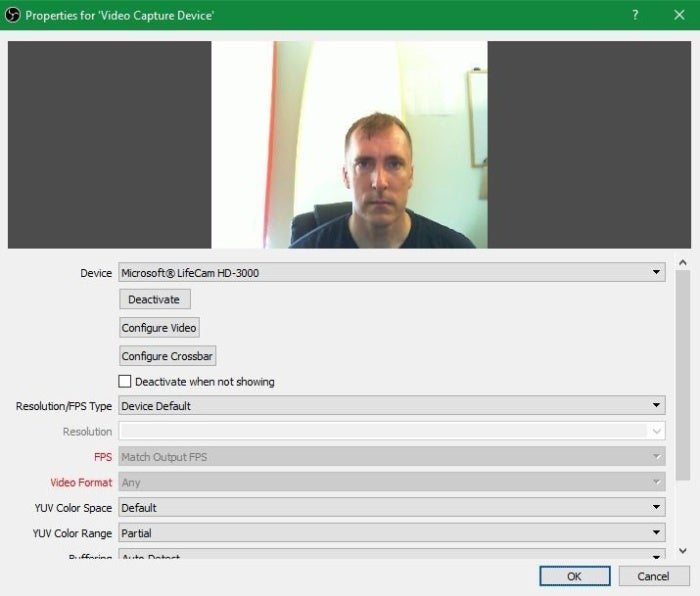 Ian Paul/IDG
OBS Studio's video capture properties window.
OBS Studio should automatically choose your webcam. If you have two or more options, however, just choose the appropriate one for your broadcast. You can mess with the settings in this window, but as long as your webcam is selected from the drop-down list at the very top, it should work just fine.
The more important thing is to decide on the angle for your webcam. Do you want it to shoot you from above, like it's sitting on top of your display? Or would you prefer a straight-on shot or something from below? To get an idea of webcam placement see what others are doing on Twitch and find what works for you. Also pay attention to lighting to make sure you're clearly visible.
While using natural light is the easiest and cheapest way to illuminate yourself, you’ll probably want a bit more control. You can find bulb-based lighting kits on Amazon for pretty cheap but there are some drawbacks including heat and fragile build quality. Or you can go down the route of LED-based systems which are typically more expensive — but come with perks like color temperature control and no heat output. In a pinch you can even use a desk lamp like BenQ’s ScreenBar that not only works as an awesome lamp, but can double as a light for streaming!
If you'd rather not have the background of your home office or den show up, you'll need to use a chroma key to get that green screen effect. You can actually make this happen with nothing more than a sheet or large curtain and some even lighting, though basic green screen setups can be found online for as little as $20. To play with chroma key settings in OBS Studio, right-click on Video Capture Device in the Sources panel and select Filters > Effect Filters > Chroma Key.
If you need detailed help to set this up, there are tons of tutorials on YouTube—such as this one—that show the process.
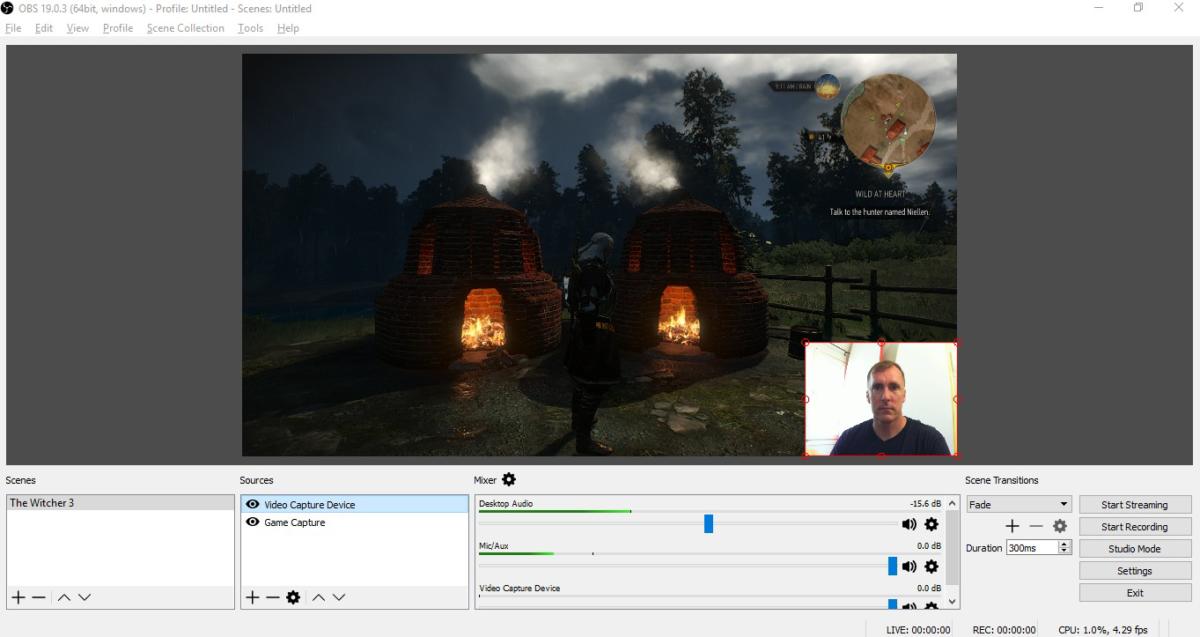 Ian Paul/IDG
Hello, webcam!
Once your webcam is enabled as a source, you can choose where it will appear in the final broadcast. The default is the upper-left corner, but you can adjust this by dragging the window around the letterbox area in the main OBS Studio window. You can also use the red border around the webcam to size it to your preference. Many Twitch streamers position their webcam feed in a small area in the lower right corner. That's far from the rule, however, and the onscreen elements of the game you're streaming will likely dictate where you place your webcam feed.
Next page: Mixing audio, setting up watermarks and the final stream
Tidak ada komentar:
Posting Komentar